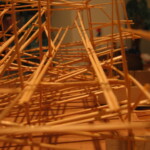
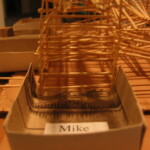
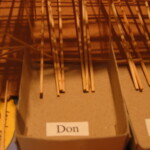
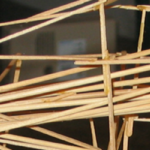
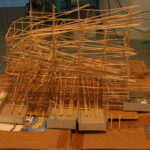
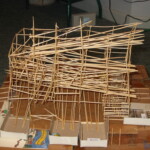
Attached each gift is a marble. Yup. That’s it! On closer inspection, each marble is a different size. Drop yours into the marble sorting toothpick machine. Where it lands determines who gets the gift. This ranks near the top of best Mad Wrapper contraptions of all time. Great fun!
Under the tree
Quietly hiding in the darkness of a rather large inconspicuous feather-light box under the protection of the broad bows of the Christmas Tree awaits the amazing Marble Match-up Machine — one of the greatest Mad Wrapper puzzlers to date.
Scattered bold and conspicuous about the base of that same tree are six boldly decorated gifts. Each decoration on each box is graced with a gem: a marble. Yes, scattered about on six gifts sit six marbles of six sizes and six colors, in six small clear pouches tied neatly with a bow. But no explanatory note. Six people in the room gaze at each other, each with a unique grinning look of keen anticipation. This could only be the work of The Mad Wrapper!
“Which marble belongs to me! Which gift is mine! Give me a hint! Where’s the clue-box, hint-sheet, decoder-gadget, whuch-a-ma-thingie to tell me what the deal is about all these marbles!” Soon the silent gift is discovered and brought to life. The people begin to laugh and talk excitedly as marbles roll freely down chutes and rails, and come to rest each at its own favorite hand-selected labeled tray at the base of the Marble Match-up Machine.
Steady Patience is Key
Constructing this marble sorter requires patience and experimentation. This project is more art than science and good art takes time to mature. I will roughly describe what to expect. I will spell out some guidelines that you may follow or ignore as you choose. I will show you some tricks that I learned along the way. Then, after reading this, I hope you will have enough information (and inspiration) to build your own version of the amazing Marble Match-up Machine. It’s a good one!
In addition to patience, you will need corrugated cardboard, toothpicks, skewers, and glue. You will need marbles. You will also need some scissors and a small pair of wire cutters. That’s about it.
Glued to the cardboard base, you will be building up a structure of toothpicks  and other lengths of wood that could, with a little imagination, loosely resemble a scale model of an old classic wooden roller coaster.
Although you might be able to complete this project within a few good days, it took me a few weeks as I worked for only about fifteen minutes to an hour each day. A major factor that will govern your time is the type of glue you use. I didn’t have a chance to try a great selection of glues but I found that I liked the good old fashion yellow woodworker’s glue. After sitting out for about ten minutes, this glue becomes nice and tacky, yet very pliable. The light toothpicks and the other wood pieces will stick exactly where you place them yet there is still plenty of time to move pieces around after gently rolling some experiments.
If you are not careful to let your glue age a bit before application, your pieces will start sliding down their supports leaving a stream of sticky glop to mark the path from top to bottom of the spike that was meant to hold them. The teardrop globs of fresh squeezed wet glue just won’t hold the weight of a simple toothpick. Gravity will win!
Elmer’s white glue is essentially as good as woodworkers glue. You will do fine with that. The down side to these polyvinyl acetate wood glues is that it takes at least half an hour to dry solidly enough to withstand the abuse of big fast moving marbles. Feel free to experiment with other glues. You might be successful with the quick-drying polyurethane glues or some the various types of super glues. If you find a good wood glue that goes on sticky and dries more quickly, you might be able to complete your project more quickly.
It is always a good idea to start every Mad Wrapper project at least a month  before Christmas. If something goes wrong, allow some time for a backup plan. (If you are really desperate there are quite a few very good one-hour projects described in other chapters of this book.) The marble sorter might take a few weeks to complete depending on how much time you can spend on it each day. It might take a weekend. It might take a month. Working at a nice slow daily pace of less than an hour a session gave me plenty of time to daydream about tomorrow’s section of track as well as all sorts of other upcoming Christmas events.
Fourth grade toothpick structure
This project was partially inspired by a fourth grade civil engineering project I had completed many years ago: the fantastic toothpick structure project of fourth grade. While I worked, I fondly reflected many times on that great year of elementary school.
The strong skeleton of my marble sorter is the same basic structure that I built when I was a youngster. Over the course of a couple of weeks, each student in the class was assigned the task of constructing a structure — any structure — entirely out of toothpicks and glue. Our teacher supplied us each with a small square of corrugated cardboard to be used as a base. She supplied each of us with one box of flat toothpicks and a bottle of white glue. From these squares of cardboard grew a great variety of engineering masterpieces erected by this group of ten-year-old early achievers. Skeleton towers of all heights and  shapes quickly filled the classroom. Most kids created simple vertical towers; one kid obtained two cardboard bases and created a three-foot bridge that spanned across an imagined void. Another kid actually had to stand on top of his desk to top off his six-foot tall creation as he piled on extra boxes of toothpicks at the upper stories of the tower. When he requested a ladder, our teacher declared, “Enough!” And he was officially done.
Flimsy in appearance, these sturdy statues held up under an amazing degree of abuse. Most of the tall ones, though, listed so far to one side that they required propping to avoid falling over and tangling with the neighbors. To everyone’s surprise, if a tower fell over — which happened often — or was knocked around by rowdy kids, it nearly always emerged as one unbroken unit.
Ever since fourth grade I have kept a small box of flat toothpicks on hand just in case I would be inspired to construct another one of those fantastic structures. At times I used to fantasize about building it as big as the linen closet in my parents bedroom — about the size of two 20 cubic inch refrigerators standing together side by side. I never did build that project and I’m not quite sure why I waited so long to put this building technique to use in any project, but it was worth the wait.
One October, many years later while I was toying with marble sorting ideas for the Mad Wrapper Christmas gift giving, I discovered my box of flat toothpicks at the bottom of a crowded drawer of collectibles. I immediately tossed aside all the materials that had previously failed me, grabbed a square of thick cardboard, and set to work gluing those little splinters into a balsa-light hefty grid on top of my cellar table.
Industrial Sorting Machines
There are many types of sorting machines used in many types of industries. My marble-sorting machine uses a technique often used in the agricultural industry. (If you discover an entirely different type of sorting machine sitting  on a factory floor somewhere, odds are its design can be applied toward a whole new Mad Wrapper decoder missing from the chapters of this book.)
Until the advent of computers, light beams and video cameras, there were only two ways to size or grade agricultural products such as fruit, potatoes, broccoli, and peas. (Eggs are graded by weight, not size so that industry uses an entirely different method of grading). Factories and farms could sort the old fashion way: by hand. Or they could bounce, roll, or slide the food across ever-increasing or -decreasing holes or gaps between the rails. Banks and vending machines sort coins exactly this way. Big things fall through big holes. Little things fall through all holes.
Truckloads of broccoli arrive at the factory to be packaged for resale. Workers will dump the loads into a hopper that feeds a sorting machine. As the broccoli glides along a narrowly slotted conveyer belt or rollers, little broken bits will fall into bins. The soup manufacturers love to pay the cheap price for these bits. They will add the tiny pieces to their basic thin soups. At the next stage in the sorter the gaps in the conveyer get larger. Little sprouts fall into a bin and are often used in stew or good chunky soup. Eventually, at the end of the line, big clean heads of broccoli fall into a bin ready to be packaged for the produce section of the supermarket.
The Mad Wrapper marble-sorting machine works the same way as the broccoli but a marble is a much easier item to sort than is a broccoli bit. There are various reasons for this. One of the best reasons is because a marble is so perfectly uniform and round. It will roll unaided along a simple sloped railing without any help from a conveyer belt or any other complicated mechanical device. Little marbles fall first as the narrow rails begin to spread apart. Larger marbles fall later as the gaps grow ever larger. Finally, the largest of all marbles rolls along all the way to the end of the line undeterred by all the hazards along the way. Each marble in the maze, regardless of size is eventually guided by a series of ramps and chutes toward its final destination: a small bin labeled simply and uniquely with a person’s name.
Searching for Marbles
Before setting out to build this contraption, the first thing you will want to do is to go search for marbles. You will easily find a couple of sizes that seem to be standard everywhere. With a little effort you will find two or three more odd sizes at the local toy store. Keep searching and eventually you will be rewarded with a great assortment of marble sizes. If you get desperate, consider raiding the family game boxes when no one is looking. Don’t get caught! If you get really desperate, take the marble out of someone’s computer mouse and definitely don’t get caught. If you pilfer the little steely from the Mousetrap game in the back of the closet, make sure you put it back when you are done! There are few things more frustrating than trying to win a game of Mousetrap with a substitute marble. And there is little worse than being the target of condemning looks from an unforgiving game-happy person who refuses to play with defective marbles. On the other hand, if you nab the ball bearing from the Labyrinth board it is mildly less catastrophic if you forget to put it back since there are many substitutes that work well in that game. If you find yourself in this uncomfortable situation you will want to know this: Even though Milton Bradley sells Mousetrap and Cardinal sells Labyrinth, Mousetrap and Labyrinth use the same ball!
Try to select marbles that vary in size more than a subtle amount. Your job of picking the best ramp width will be much easier with few marbles that are sized widely. There are some limits. The largest marble must be smaller than the length of a toothpick so it can pass through all the tunnels and bridges in the maze. There isn’t a limit to the size of the smallest marble but tiny pea-sized marbles may not roll down the track very easily. The marbles should be a reasonable weight. Light plastic or wooden balls are much harder to work with than the glass or steel marbles that I used in my sorter.
You don’t need to find all the marbles before you start building your ramps but it is probably a good idea to have on hand the largest few marbles that you plan to use. Keep your marbles handy. Every step requires a procession of 3 or 4 to be set into motion at any given time.
Getting it Built
There are two major components to the structure. You will need some rails to guide the little glass balls toward the finish line at the end of the maze. I used sections of twelve-inch wooden kabob skewers but any type of long, thin, straight wooden stick should work. Also you will need the strength of a 3-dimensional grid to support the rails — toothpicks are perfect.
Pour a small puddle of woodworkers glue onto a separate piece of paper or cardboard then let it dry slightly to a thick sticky goop before dipping a toothpick.
The toothpicks, glued together like the iron skeleton of a city office building, make a good strong grid to attach ramp rails made from wooden kabob skewers. Although this grid as a whole is very strong, each individual joint can be somewhat brittle – brittle enough to warrant a warning on the outside of its package. Odds are no one will be rough enough to break the maze but it is better to be a little over cautious than to be under cautious.
You will need to start the structure with a double height skeleton framework of toothpicks. Poke a grid of toothpicks into a 12 or 18-inch square corrugated cardboard base. Before poking a toothpick into the cardboard, dip the tip into yellow woodworker’s glue for a good solid base once the glue has dried. Each stick should stand slightly less than a toothpick length away from each of its four neighbors. On top of each spike, lay down another toothpick creating a bridge to its neighbor. Always place a small dab of glue at each joint. Don’t spend a lot of time attempting to get this nice and neat and perfect right now. About half of every toothpick you have just glued will later be cut or pulled off as you build up a path for your marbles.
I found it to be a lot easier if I used slightly dried slightly gummy glue. If I used fresh glue the Toothpicks placed on an upper layer would tend to slide down soon after they were placed into the structure.
Don’t make your ramps too steep. You will have a lot more control over a gently rolling ball than you will have over one that is whizzing down the track at a blinding rate of speed. Often a fast moving little ball will jump an opening quite larger than might initially seem possible. Often a fast moving large ball will crash through the barrier at the end of its straightaway. That would be bad.
Before the toothpick framework gets too tall you will need to lay down some rails for some of the the larger marbles to drop and roll down to convenient catching areas in the lower layers of your roller coaster. I found it easiest to start near the top — on the third layer — and work downward.
A gradually spreading set of rails can be used to sort a couple of marbles. Glue down a set of rails with slightly dried sticky glue. Wait a few minutes for the glue to half-dry then roll a large marble down the track. Hopefully this marble will roll the entire length of your spreading rails. If so, roll a smaller marble. You will probably be required to adjust the pitch or the width of your rails to get this smaller marble to fall midway down at a good spot to be caught by a set of rails below.
Ideally it is easier to roll a marble down a track, pay attention to where it falls, and build the next layer to catch it. Unfortunately it is usually not easy to build a lower layer exactly in the landing zone of a falling marble. Widen or narrow your gaps so your marble falls in a more convenient landing zone. If your gap needs widening, use wire cutters to break hardened glue and wood.
Odds are, for all sorts of reasons, you will discover that a few of your marbles will either fall off the track early or get hung up on a toothpick on the way down. Make adjustments by cutting, adding, or moving then regluing. Try again in a few minutes then repeat until the all the marbles from today and all previous days get down successfully. This is a good time to pause. Take a break. Quit for the day. Let your glue dry. At the beginning of your next session, roll all of the marbles from past sessions about a dozen times each and decide if you are ready to start a path for a new marble.
Roll a new marble tomorrow after a good night of sleep and a day of restless planning and anticipation.
The following day spend about 10 minutes rolling the big marble down the run: 1) because it is fun; 2) If you need the excuse to play, call it QA (quality assurance) — everything must be tested! Then roll a new smaller marble down the track. If it falls through an accidental hole during its travels, quietly celebrate your brilliance (or luck); then note the place where it fell and glue down some rails to catch it. Once you have two marbles that pursue two paths, celebrate with some QA (play time!) — roll each marble 25 times — then cover up the project from nightly prying eyes to let the glue dry in peace.
 Keep repeating this evening regime until all your marbles fall to a unique and special spot on the table. About half marbles will need coaxing to get them to fall properly. Do whatever you must. Cut holes. Break down yesterday’s rails in favor of a wider spread. Add rails down the center that push the little balls left or right toward the drop of your choice.
Build daily. QA extensively. Get those marbles sorted!
Sorting Strategies
There are several strategies to sorting marbles. One method is to make a big hole in the middle of a straight section of ramp so half the marbles fall in and the rest of the marbles roll to the end of the section. This divides the maze into two large independent sections. This is a good strategy to use at the top of the maze if you have a lot of marbles to sort. Another method is to make a small hole in any straight section that is just big enough for the smallest marble to fall in. No further sorting is necessary for this small marble so simply get it to the bottom along a few haphazard ramps. You might also find it useful to make the hole big enough for two marbles to travel together to be sorted on the next section of track.
Once all the marbles exit the maze on unique ramps, finish the project by gluing down something to catch each marble at the bottom. I folded pieces of cardboard to form little three sided trays and glued them down at each exit. Each tray is labeled with at person’s name or maybe a photo cutout. Once the exits are clearly marked you may be done. I recommend putting it away for the night. Come back the next morning. Roll the marbles down a few times for fun. Step back and admire your project. The construction should be haphazard but interesting to look at. If not then try adding some toothpicks here and there simply for show, or clip out a few unneeded sticks that look out of place.
Launch Pad
You will want all your guests to drop their marbles from the same starting point each time. Consider making a tunnel of toothpicks that covers most of the top rail. Not only will this mark an obvious starting point, but it may actually make the design more interesting to look at.
A week later, get out all of your marbles and spend half an hour rolling them down the maze to make sure everything is working properly. Then, sitting with the sorter in front of you, start wrapping presents. Roll a marble down, wrap that person’s present, and attach the marble to the top of it. A piece of cellophane or a small plastic sandwich bag tied with a ribbon makes a great pouch to hold the marble. Roll another marble and wrap another present. Proceed until all the presents are wrapped then put them under the tree.
If, at the last moment, a new guest announces attendance for Christmas, don’t despair. Add another layer of toothpick scaffolding. Find another marble that is smaller than all the others. From the new starting point, get all the marbles to the old starting point but let the new tiny marble drop down early. Catch it with new rails and guide it to a spot where you can add one more tray.
Wrapping it Up
Finally glue your marble maze into the bottom of a large box. You may want to glue it into the box in a way that allows it to be easily removed without damaging the project. Don’t glue the cardboard base directly to the Christmas box. Instead, glue about two-dozen toothpick fingers all the way around the base. While the maze is sitting in your box, dip both ends of a toothpick in glue. Lay the toothpick down so one end touches the cardboard base that holds your sorter together and the other end touches the bottom of the box. Repeat this all the way around the perimeter until about two-dozen toothpicks are in place. When the glue dries your structure will be safe and secure. When it comes time to remove everything from the box, simply break the glue joints and lift out the unit. Nothing gets broken.
Wrap it, tag it, and put it under the tree. This big feather-light present will generate nearly as much conversation as all the marble-tagged presents dispersed around it. Those happy conversations will continue for years to follow. It will be remembered.


